Flower Meadow Cushion with tips for sewing curves
Today I’ve got a finish to share with you – hurrah – and some tips on how to sew curves! It’s been a fair while in the making as, although it’s not very big, I’ve been working on it as and when inspiration strikes, trying out different techniques and methods. It’s been quite fun!

The idea for this cushion originally came to me when I started working with my Drunkards Wheel templates. Whilst making the Candy Swirls Quilt, I started playing with the different ways in which the blocks could be tessellated……I kept thinking of flowers and couldn’t help grabbing some fabrics to make a mini meadow!

I love sewing curves. They open up the opportunities to make so many different patterns. Because of the segments in the Drunkards
If you’ve never sewn curves, they can be a bit scary to start with – I remember reading up on it so much before finally having a go. And it wasn’t anywhere near as bad as I thought it would be, honestly!!! The trick is to experiment and find what works best for you.
Some Hints & Tips for sewing curves;
- Use a smaller rotary cutter eg. 28mm for cutting the curves around the templates, with a max of two layers.
- Do not use too smaller a stitch length (eg. Anything less than 2.4) – if you need to redo a seam, using a larger stitch length will prevent the fabric from stretching too much.
- Sew at a slower speed than you normally would, until you are more familiar with the shape. You may also find stopping and repositioning the fabric as you work around the curve, will help to give you a smoother line (if you have one, a knee lift can be very helpful).
- I like to work with the bigger curve (with the excess fabric) on the bottom.
- Holding up the fabric as it is being fed into the machine can help with easing the bottom fabric into the curve.
- The seam ripper is your friend! It can be used to help keep the fabric in place as the fabric goes through the machine and sometimes you will need to redo a seam – but the more you sew, the less this will happen!
The Flower Meadow is a great way of practising sewing curves together in different ways…….the purple flower (a tulip?!) was the trickiest because of all the seams in the centre. I found that sewing the blocks together in to pairs and then basting the centre seam of the two halves in position before joining them together helped with the accuracy, and is a great trick to use whenever you’re working with bulky/difficult seams.


Once the flowers had been made there was a small debate about what to make it in to……..I didn’t need three more cushions (Mr f&f is already moaning!) and then inspiration struck: if I used a king-size pillow, it would be perfect for my book-worm daughter to lean against whilst reading!!!!!
To make the cushion top I went improv and low-volume, adding fabric scraps until I reached the size I wanted (36″ wide x 19″ tall). I worked on each of the flowers individually before adding the panels together. I’ve added the cut measurements to give you an idea if you would like to make your own, but you can alter it to whatever size you want! Or maybe even make lots of rows and turn them in to a quilt?!

Can you see the yellow thread where I hand-basted the quilt layers together? I remember reading somewhere once that the best way of making a job you don’t like bearable, is to find the most fun way of doing it. I’m not a fan of basting quilts, so figured this would be worth try. It was certainly a fun way of doing it (although I’m not sure I’d be so keen on a big quilt!) and the layers kept together really nicely whilst I was embellishing it, so I’ll definitely do it again.
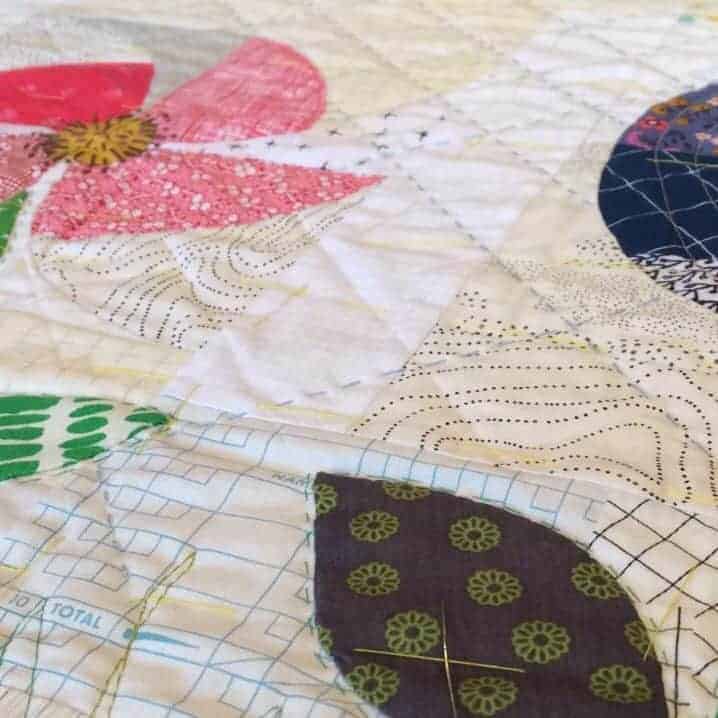
Some bias binding strips for the stems, free-form leaves which were needle-turn appliqued and it was all ready for quilting! I used a mix of embroidery, free-form quilting, echo-quilting and

Do you ever make a project just to play and try new things?
That’s all for now, back soon,
S x
Today’s sky::: bright blue but freezing cold!!!
If you would like monthly news and updates, please sign-up to my newsletter.
To check out my quilt and accessories patterns, visit my Pattern shop.
For my favourite sewing equipment and tools, visit my Amazon store.