
Upcycled Tin Craft Tutorial – Mini Sewing Kit
The other day, Mr f&f left an empty tin container on the side for me to keep sewing supplies in. I think he thought I was just going to stick some pins in it, but Oh No! This hinged tin was too good not to craft into something special!
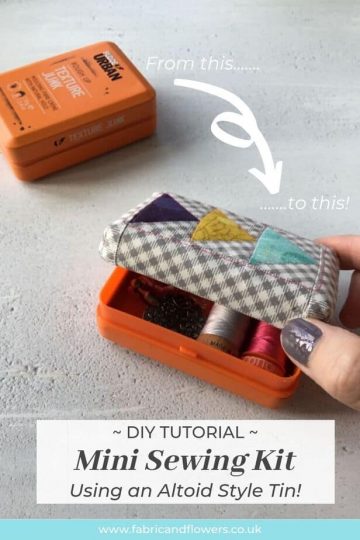
I don’t know if you’ve seen these tins before? They’re very similar in size to an Altoid tin, but slightly deeper at 1″, which means that you can fit a spool of thread in easily, making it ideal for a mini travel sewing kit!!!
Would you like to see how I made it?
Table of Contents
What you will need
- Hinged Tin
- Scraps of fabric
- (3) Scraps of wadding min. 5″ x 4″
- Felt
- Super Glue (I used this and also an all-purpose glue once I ran out!)
- Elmers Glue
Ready? Let’s get started!
Prepare the tin
To clear out any excess wax, I wiped around the inside of the tin with a cloth. Pour in some boiling water and let it sit for a little while. Tip the water out, give it a wipe and we’re good to go!
Take a piece of wadding measuring approximately 5″ x 4″. Apply superglue over the tin lid, paying special attention to the rim. You should find that you can ease the wadding around the corners without having to do any folding. Once it’s dry, you can trim any excess wadding so that it is level with the edge of the lid.


This tin has a piece of coated plastic just inside the lid. To take this out you will need something fine and flexible (I found this cake tester to be ideal – as you can see, it’s had a lot of use in its time!).


I didn’t bother to remove the piece of double-sided tape that was left behind as it will eventually be covered back up!
Make the Patchwork Cover for the Tin Lid
To make the cover, and achieve a neat finish around the edge of the tin, I made a patchwork top. For this you will need to cut;
- Centre Panel (1) 3.5″ x 2.5″
- Wadding (1) 3.5″ x 2.5″ (optional)
- Edge panels (2) 3.5″ x 1.75″ and (2) 5″ x 1.75″
For this, you could use one type of fabric, or get creative and patchwork a mini block! I’ve got a bit of a thing for flying geese at the moment, so I chose to make the centre panel out of three small units;
- Flying geese (3) 2.5″ x 1.5″ rectangles
- Background (6) 1.5″ squares


Take the centre panel, place on a piece of wadding and quilt if desired and place the smallest edge panels Right Sides Together with the top and bottom edges. Stitch using a standard seam 1/4″ seam allowance.
Press the edge panels away from the centre. Take the two remaining pieces and place Right Sides Together on each side. Repeat as before, making sure to only secure the stitches on the edge that will be at the front of the tin (as we will be undoing some of the stitches on the seam that will be nearest to the hinge).
[Optional] Topstitch around the edge of the centre panel.
Use a quilting ruler and draw a 1.25″ square in each corner using a pencil on the Wrong Side of your fabric.


For the top edge of the panel – that will be positioned around the hinge – use a seam ripper to undo a few stitches to give an opening of c. 1/2″.

Fold the edge strip down by 1/2″ (so that the fabric edge is roughly level with the squares that you’ve drawn). Finger press and stitch in position.
Box the corners by folding the fabric diagonally Right Sides Together. Pin, and stitch along the pencil line. Trim excess fabric to leave a 1/4″ seam allowance. Repeat for the remaining corners.


Take the tin, and starting at the back by the, place some Elmers glue along the lip of the edge.
Place the folded edge of the fabric on top – making sure to cover the wadding – and hold in position to secure. Leave for a few minutes to dry.


Apply glue to the top of the tin (I have only applied it where there is more than one layer of fabric to minimise the glue coming through and making the fabric stiff) and gently pull the cover over the top of the tin.
Gently stretch the cover into position. Fold the fabric over the edges of the tin and use wonder clips to hold in position whilst it dries.

Once dried, remove the clips, apply superglue along the inside of the lid rim and press the fabric back down into position (being careful not to get your fingers stuck too…..just saying!)
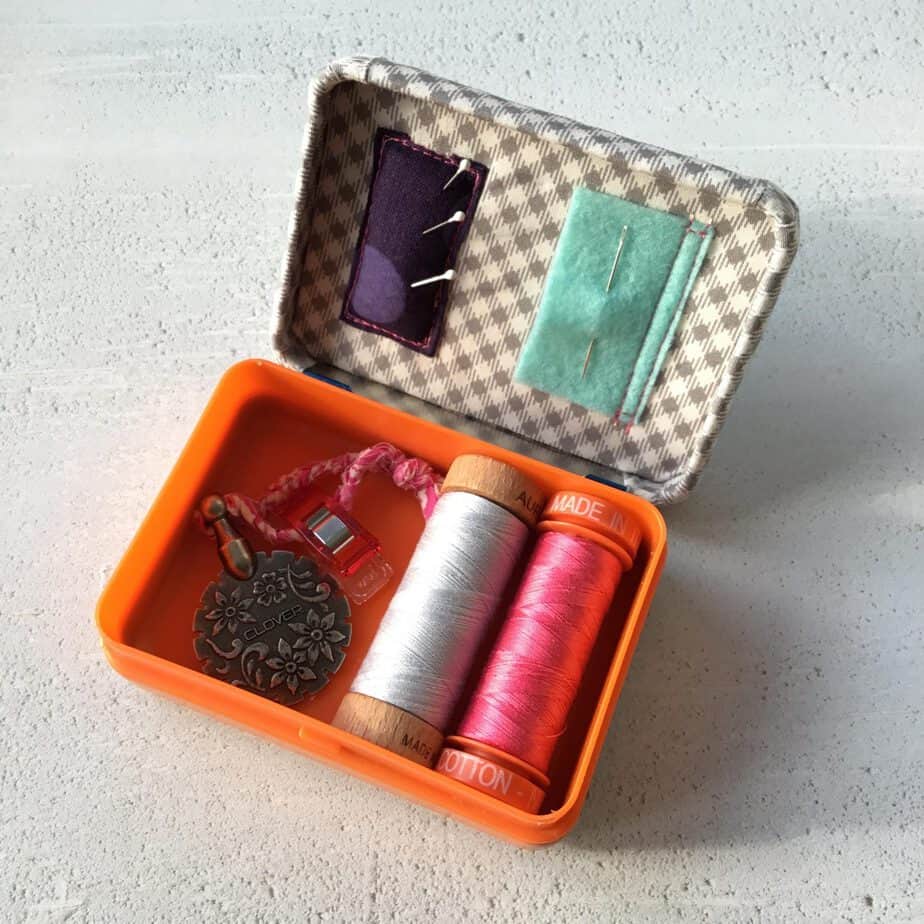
Making the Needle Keeper and Pincushion
- Lining fabric (1) 5″ x 6″
- Pincushion fabric (1) 1.5″ x 2.25″
- Needle minder felt (1) 1.25″ x 1.75″
Using scissors, trim around the edge of the cardboard from the lid (say 1/16″ – enough so that when it is wrapped with fabric, we will still be able to fit it back in!).


Take the largest piece of fabric and place the card in the centre. Fold the fabric around the card and finger press to give you an idea of the size. Remove the card and place on top of a piece of wadding.
Take the felt for the needle keeper and place on the lining fabric (mine is roughly 1/2″ in from each edge). Stitch along one of the long edges to secure in position.


To make the pincushion, fold each edge under by 1/4″. Press. Place on the lining fabric (again, mine is roughly 1/2″ in from each edge), pin in place and edge-stitch around, leaving a gap for stuffing.
Gently stuff the pincushion with some wadding scraps. Close the opening by stitching around the edge of the pincushion – you may find using a zipper foot will help you to easily move around the stuffing!
Finishing your Mini Sewing Kit
Fold back the edges of the lining to trim the wadding to size. Apply super glue to one side of the cardboard and press the lining in place. Fold the edges of the fabric over to stretch into position and wonder clip in place whilst it dries.


Once dry, glue the fabric to the wrong side of the card to keep in position. Finally, apply glue to the inside of the tin lid, push the lining in and hold in position.

If desired, you can cover the bottom of the tin with some felt and presto – a pretty little sewing kit upcycled from a hair wax tin!!!! I’m not sure that anyone will ever know?!
Can’t wait for Mr f&f to finish the next tin…….these will make great gifts for any sewists in your life, although if you left off the pincushion and needle keeper off, it could make a lovely trinket box too?!
Hope you’ve enjoyed this tutorial – do let me know if you make one!
S x
Today’s sky::: overcast. Grey and very rainy!
If you would like monthly news and updates, please sign-up to my newsletter.
To check out my quilt and accessories patterns, visit my Pattern shop.
For my favourite sewing equipment and tools, visit my Amazon store.


