
Tutorial – Making and Sewing Applique Circles using the Tin Foil Method
For this month of the Mindful Quilt Along, we are appliqueing circles on to background fabric, where the fabric has been moulded into shape using the tinfoil method.
It’s resulted in a little discussion within the Facebook group! For some it’s a new technique, there are curves (eek!) and it’s one of the trickiest blocks that we’ve tackled so far (although still achievable in the 15-30 minutes a day!).

There are a number of different ways of appliqueing circles, but this is one of my favourite techniques as it’s quick and easy – and fun! – using tin foil to create the shape.
I first came across this method from Sarah Fielke a few years ago, and have added a few extra steps which you might find useful.
I have even had a go at making my first YouTube video (eeeeek!) if you would prefer to watch the process instead!
Table of Contents
What you will need
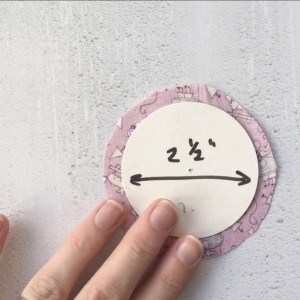
For this example, I am showing you how to make a 2.5″ applique circle to sew on a 4.5″ background square. Please adjust your measurements as needed!
- Cardboard
- Compass Cutter
- Tin Foil (min 5″ square) *
- Fabric for circle (min. 3″ square)
- Fabric for background (4.5″ square)
*Note – thicker tin foil works best for this method, as it helps to press the crease in.
Make a Template
I like to make my own cardboard templates for applique circles, using old cardboard boxes that I have to hand. That way, I can achieve whatever size I want without having to wait to buy the perfect template!
A few years ago, I picked up one of these gadgets, and they make cutting circles an absolute breeze!

It’s effectively an extendable pair of compasses, where the pencil is replaced with a blade.
It can cut circle’s up to a diameter of 30cm (nearly 12″) – I’ve only ever used it on cardboard as I worry that it would drag the fabric, and it works brilliantly (you can see it demoed in the YouTube video!).
Once I’ve cut out my template, I like to double-check that the circle is the correct size, before writing the measurement on it, so that they don’t get mixed up and will be easy to grab for another project.


I normally cut a couple of templates so that I can prep a few circles as a time.
You will find that with continued use, the cardboard softens and will eventually need replacing, but you will get a good few uses out of them!
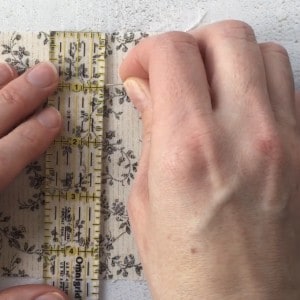
Cut Fabric Circle to Size
I generally cut the fabric by eye, leaving an approximate 1/4″ seam allowance all the way around. So, for a 2.5″ circle I will need a piece of fabric at least 1/2″ bigger to cut from.
If the circle is small, I hold the template on top of the fabric and cut around it with scissors,
Alternatively, I lay the fabric on a cutting mat, place the template on top and use a rotary cutter to trim the fabric to size.
Rotary cutting is a great way of cutting lots of layers at the same time, just take it slowly and mind your fingers!
Prepare the Applique Circles
Take a square of tinfoil which is at least twice the size of the circle diameter (for this example, I am using a 5″ square piece of foil for a 2.5″ circle).
Lay the tinfoil shiny side down. Place the circle fabric Right Side Down in the centre of the foil.
Place the cardboard centrally on top of the fabric. When you are happy with the position, hold the template and fabric in place.


Gradually begin working around the template, folding the tinfoil up so that it sits at a 90* angle to the cardboard and the fabric starts to ‘flute’.
When you are happy that there are no folds in the fabric around the edge of the template, press the tinfoil down and gather the excess tin foil in the centre to create a stalk.
Use an iron to press around the edge of the tinfoil to help set the crease. Leave the tin foil to cool before unwrapping.
Sew the Applique Circles
Position the prepared circle on to the background fabric.
With these blocks, there is a 1″ border around the edge of the circle. To find the circle position, I mark 1″ in from each seam edge with a pin and place the circle so that the widest points of the circle match the pins.
Pin the circle in position – if you’re working with bigger circles, you may want to use more pins to secure.
TIP – I like to use applique pins as the shorter length means that I’m less likely to get the thread tangled around them whilst sewing and minimise finger pricks!!!
Sew in place using a slip stitch: turn the fabric under using the iron crease as a guide as you work your way around the edge of the shape, making sure to bring your needle through the edge fold as much as you can for invisible stitching.

I hope you’ve found that useful – I actually find it to be really calming as there is a certain degree of concentration that is needed that makes it very mindful!
Do let me know if you have any other questions!
Thanks,
S x
Today’s Sky::: Blue skies. Finally!
If you would like monthly news and updates, please sign-up to my newsletter.
To check out my quilt and accessories patterns, visit my Pattern shop.
For my favourite sewing equipment and tools, visit my Amazon store.


