
Quilt Now Little Zippy Pouch Tutorial::: how to add zipper tabs
Hello everyone! How are you all? I’m very excited to have a project – the Little Zippy Pouch – in Issue 9 of Quilt Now, which came out this week.

The (Not So) Little Zippy Pouch is available to download now and includes two sizes!
!!! The (Not So) Little Zippy Pouch pattern is now available !!!
it includes two (2) sizes and an optional slip-pocket to organise all your bits and bobs!
I had lots of fun working it out and, measuring around 5″ (h) x 8″ (w) x 3″ (d) it’s the perfect size for carrying make-up around although I think it could also make a fab project bag.
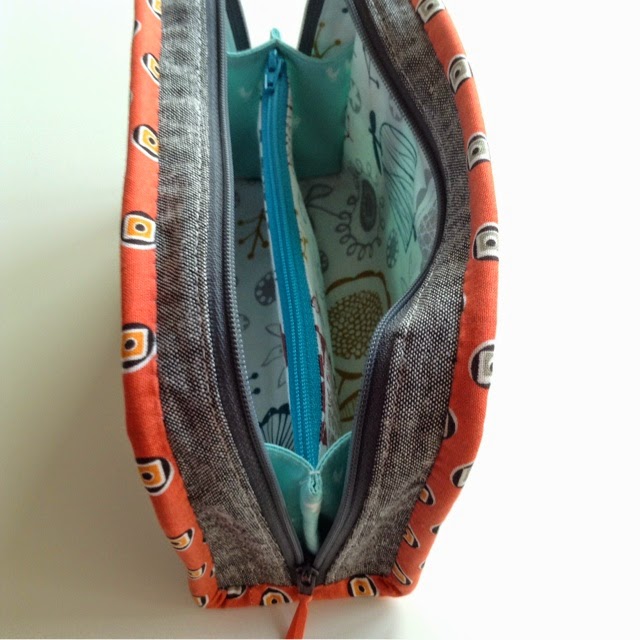
I made another Little Zippy Pouch for a friends birthday last week and added zip tabs and thought I’d put up a tutorial just in case you would like to add them too.

To Make the Zipper Tabs you will need;
- (1) 1 1/2″ x 4″ fabric
- (1) 1 1/2″ x 4″ interfacing
Make the Zipper Tabs
Iron interfacing to the wrong side of the zipper tabs. Cut into (4) 1″ strips along the long side

Optional – secure the open end of the zip together with a few stitches.
Taking two zipper tabs, place them right side together, sandwiching the zipper in between. Make sure that they are just on the other side if the metal zipper tabs so that sewing machine needle doesn’t get broken!!!
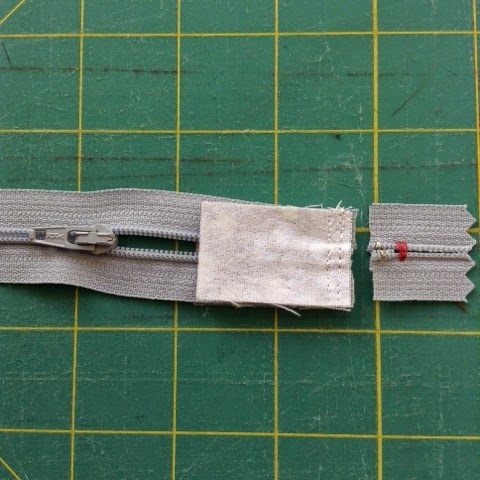
Secure in place using a 1/4″ seam allowance. I also completed another line of stitches at 1/8″ for extra strength. Trim the zip.
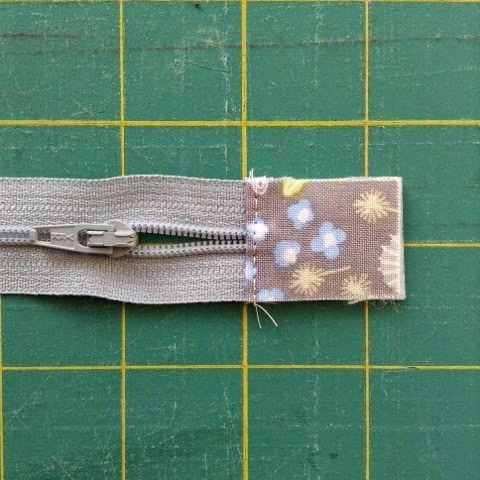
Fold the zipper tabs back so that they are wrong sides together. Finger press/iron. Topstitch.

To add a tab to the other end of the zipper, use a ruler to measure 16 1/2″ from the end of the zipper tab that you’ve just made and mark the zip.
Follow previous steps for adding the zipper tab. Once everything has been trimmed and top-stitched the zip should measure 17 1/2″ in total from end to end.
Continue with the instructions for making the bag as detailed in the pattern.

!!! The (Not So) Little Zippy Pouch pattern is now available !!!
it includes two (2) sizes and an optional slip-pocket to organise all your bits and bobs!
For even more tips, you can follow the Zippy Pouch Along here;
- 17th November – Launch and gathering supplies
- 20th November – Constructing side/zip-bands and pocket
- 22nd November – Putting the Zippy Pouch together
- 27th November – Finishing the Zippy Pouch
- 5th December – Finished Zippy Pouches and winner announced
If you have any questions, please do get in touch. And if you make one please use the hashtag #littlezippypouch as I’d love to see them all!
Have a great weekend,
Sx
Today’s sky – overcast and miserable
If you would like monthly news and updates, please sign-up to my newsletter.
To check out my quilt and accessories patterns, visit my Pattern shop.
For my favourite sewing equipment and tools, visit my Amazon store.


That's a great way of doing zipper tabs!
I've got my copy ready for your IG sewalong Sonia! Excited! xo