Tutorial – Mini Charm Medallion Cushion, Part 2
Welcome to Part 2 of the Mini Charm Medallion Patchwork Cushion Tutorial! It’s a fun little project that doesn’t need much fabric – just one mini charm pack and one Fat Quarter (or you could raid your scrap bin!) and uses a lot of the basic quilting skills that were covered in #QuiltingTheory.
You can find Part 1 here where the materials, cutting preparation and instructions are detailed.

Today, we are going to finish our cushion top (or mini quilt/table runner….whatever you fancy!) by adding the final borders.
Border 3
- Take 2 (two) 2″ x 11″ strips. Place Right Sides together on opposite sides of the Centre Star, and sew. Press border pieces away from centre block.

- Take 2 (two) remaining 2″ x 11″ strips and 4 (four) 2″ squares.
- Place a square either end of each strip, and sew Right Sides Together. Press.
- Place strips on the remaining side edges of the star and sew. To help with accuracy, nest the seams of the corner blocks, pressing them towards the strip.
Finished size: 14″ including seam allowance.
Border 4 – HSTs and 4-patch cornerstone
- Pair 18 (eighteen) mini charm squares Right Sides Together with background squares and make HSTs using the same method as for the Centre Star.

- Sew 2 (two) HST strips to opposite sides of the mini-charm medallion top.
- Arrange and sew together into 4 (four) strips of 9 (nine) HSTs – I like to chain-piece mine together in rows, as pictured above for speed and also so that I don’t lose my arrangement!
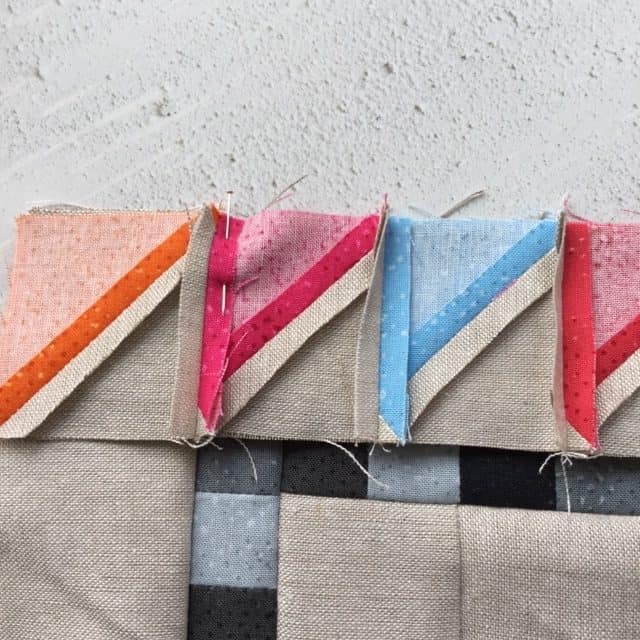
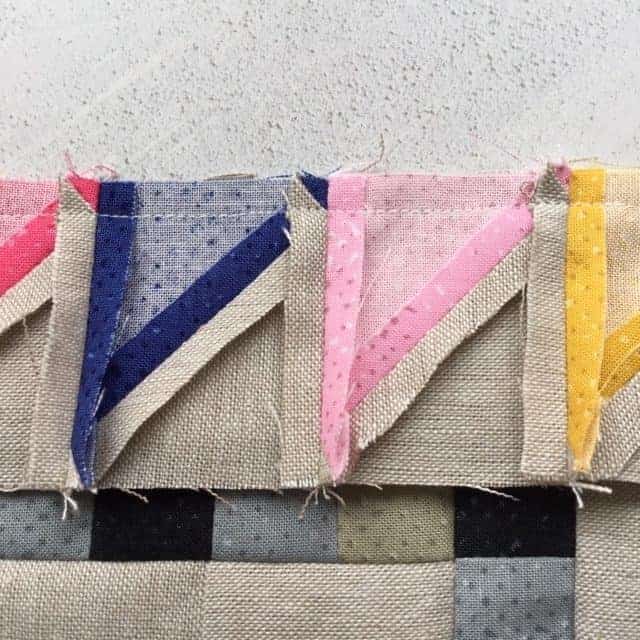
TIPS FOR SEWING HST BORDER: press the seams open to reduce bulk. Sew with the wrong side of the HSTs facing up – this helps to ensure that all the seams are open as you sew, as well as ensuring that your stitching line matches the bottom points of the triangles.
- Take the 2 (two) remaining mini charm squares and background squares Measure and draw a line 1.25″ from one edge of either the mini charm or background squares (depending on which one will show the line better!)
- Pair a mini charm and background square Right Sides Together. Sew 1/4″ either side of the pencil line on both squares (A).


(A) 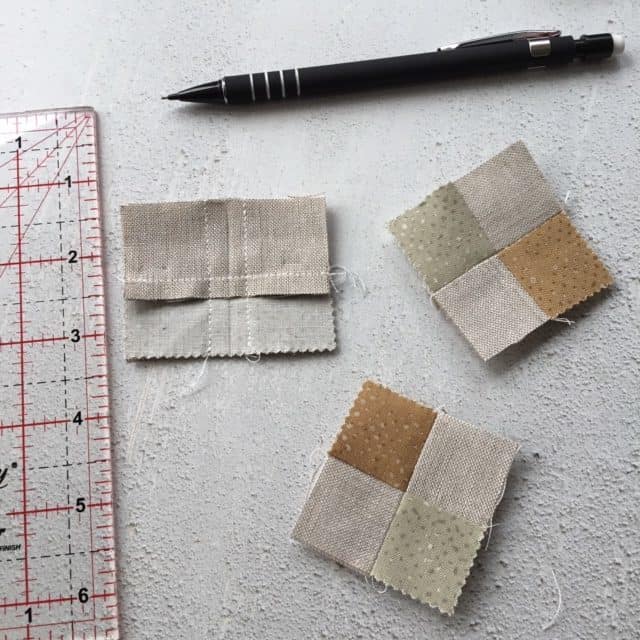
(B)
- Cut each pair in two by cutting along the pencil line, for a total of 4 (four) units. Finger press open. Draw a line 1.25″ from one edge at a right angle to the join to form squares and again sew 1/4″ either side of this line (B).
- Cut each unit in half again along the pencil line to provide 4 (four) 4-patch units to go in each corner.

- Place a 4-patch unit at each end of the two remaining HST strips and sew, before joining to the remaining sides. Press.
Finished size: 17″ including seam allowance.

And there we go – all finished!
I made mine into a cushion with a hidden zip……you can find a tutorial here. It’s one of my favourite, quick ways of achieving a lovely looking zip with minimum effort!
I hope you’ve enjoyed this tutorial – do let me know if you have any questions. And don’t forget to use #minicharmmedallion if you do make one!
S x
Today’s sky::: beautifully blue – it feels like summer might be on it’s way!
If you would like monthly news and updates, please sign-up to my newsletter.
To check out my quilt and accessories patterns, visit my Pattern shop.
For my favourite sewing equipment and tools, visit my Amazon store.