
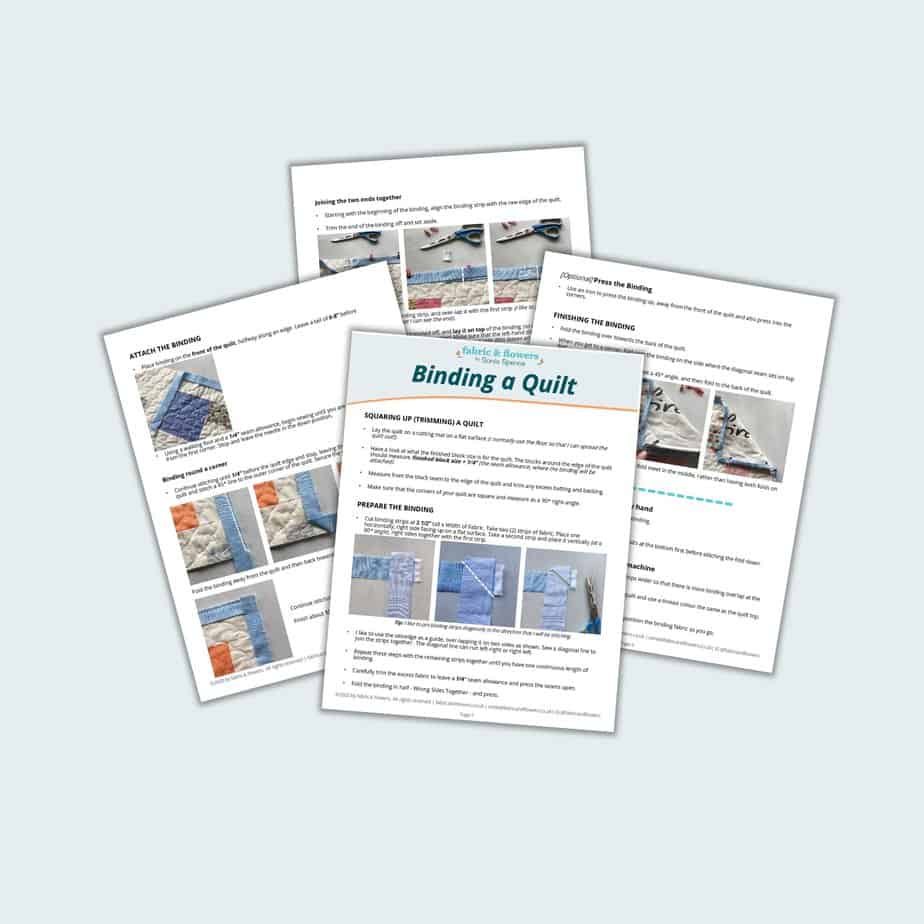
Tutorial – How to Bind a Quilt with Perfect Mitred Corners
Hello! After writing Nine-Patch Pop – a beginner-friendly quilt pattern – I thought I would share with you a tutorial for how to bind a quilt with perfectly mitred corners! If you’re binding your first quilt and aren’t quite sure what to do, or are curious to see what methods I use, then please read on!

NOTE: This post may contain affiliate links, which means if you make a purchase I may make a small commission at no extra cost to you. You can read my full disclosure privacy policy here. Thank you.
There are lots of methods and sometime’s what I do depends on what I’m making. For example, I love to hand-stitch binding, but if a quilt is for charity or a new baby and might be washed lots, I prefer to machine stitch.
After trying lots of different techniques (and making many mistakes!), I thought I would share the steps that I now follow each time to achieve near-perfect binding on my quilts (because every now and then there’s always one that’s not quite right!).
In this post, I am sharing each step of binding from preparing the quilt and binding strips through to a finished quilt. If you would like a free handy Binding Guide, please sign up to my newsletter to receive a printable copy of this post.
FREE! Binding Guide!
Get a 4-page guide for how to bind your quilt including handy hints and tips straight to your inbox!
Table of Contents
Preparing the Quilt: How to Square up and Trim a Quilt
A bit like decorating, the key to good binding is lots of preparation! The first step is squaring up and trimming the quilt to size.
This is a job that is definitely made easier by using a quilting ruler, cutting mat and rotary cutter. It is not impossible if you do not have this equipment, it will just take a little more time and care.
Lay the quilt on a cutting mat on a flat surface (I normally use the floor so that I can spread the quilt out!).
Have a look at what the finished block size is for the quilt that you’ve made. The blocks around the edge of the quilt should measure finished block size + 0.25″ (the seam allowance, where the binding will be attached).
Measure from the block seam to the edge of the quilt, and trim any excess batting and backing.
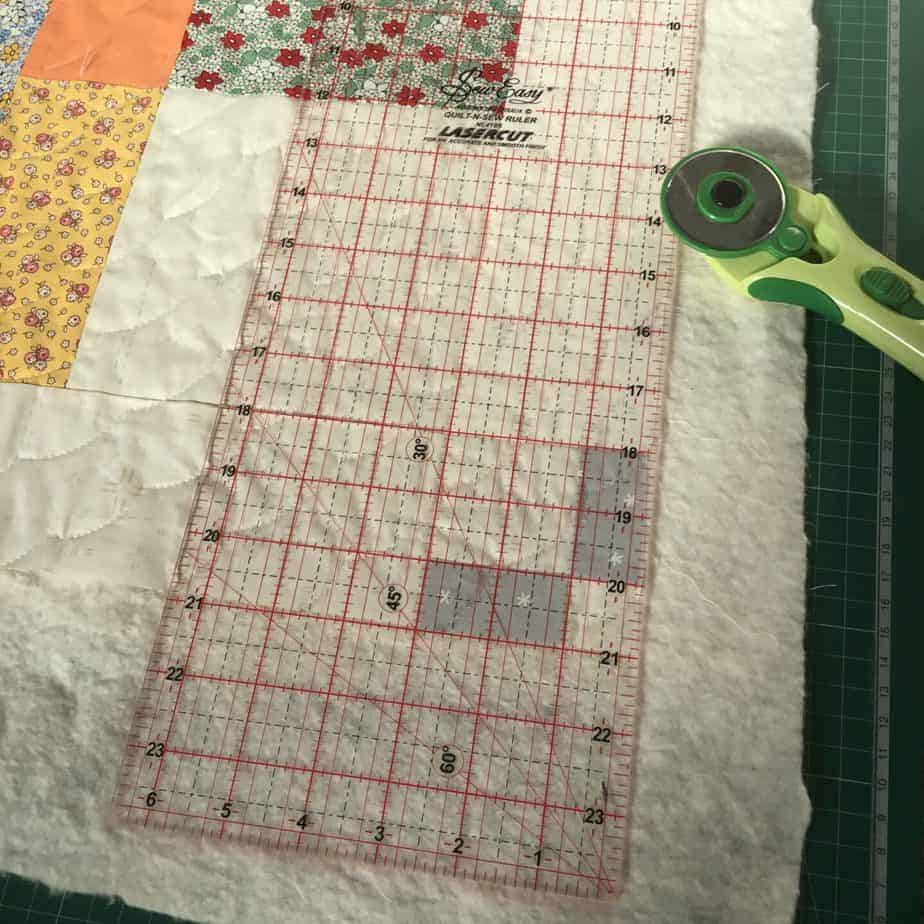
For example, this quilt had a border with a finished size of 2.75″, so the quilt was trimmed 3″ from the seam line.
If you are using a quilting ruler, you can gently pull the quilt into position so that the seams line up with the ruler marks. It is worth taking your time at this stage to achieve a neat finish;
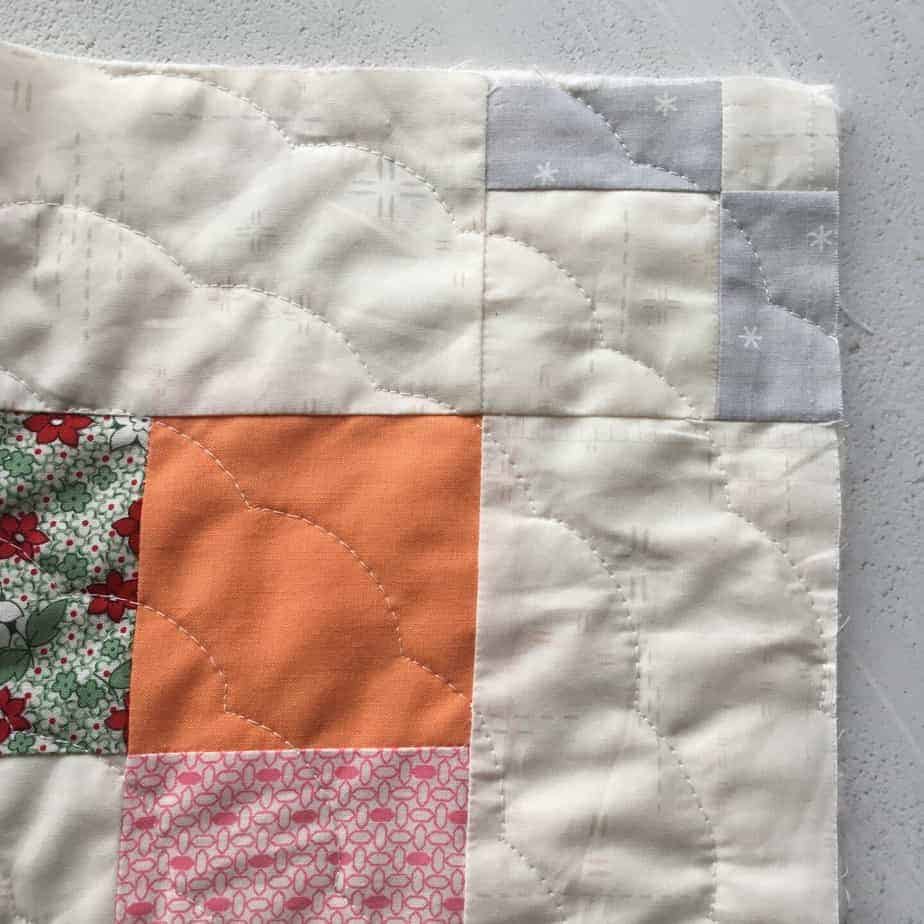
- Don’t forget, that you can also hide a few ‘sins’ within the seam allowance! As much as I try, there will sometimes be the odd block that doesn’t quite come out at the right size or is slightly smaller than it’s the neighbouring block (on the picture above, the top grey block is at a slight angle to the ‘true’ edge). As long as any difference is within the 1/4″ seam allowance where the binding is attached, you can disguise any slight differences.
- Make sure that the corners of your quilt are square and measure as a 90* right-angle.

Joining the Binding Strips
Quilt patterns normally advise cutting binding strips at 2.5″ wide which, when folded in half and stitched in place give a finished bound edge of 1/4″. You can go wider or thinner, but the method for joining the strips is the same (you can see a wide binding example here).
Binding strips are generally joined together with a 45* angle, so that the seam is distributed along the quilt edge when it is folded over. This helps to reduce seam bulk and makes it easier to sew through.
Take two (2) strips of fabric. Place one horizontally, right side facing up on a flat surface. Take a second strip and place it vertically (at a 90* angle), right sides together with the first strip.
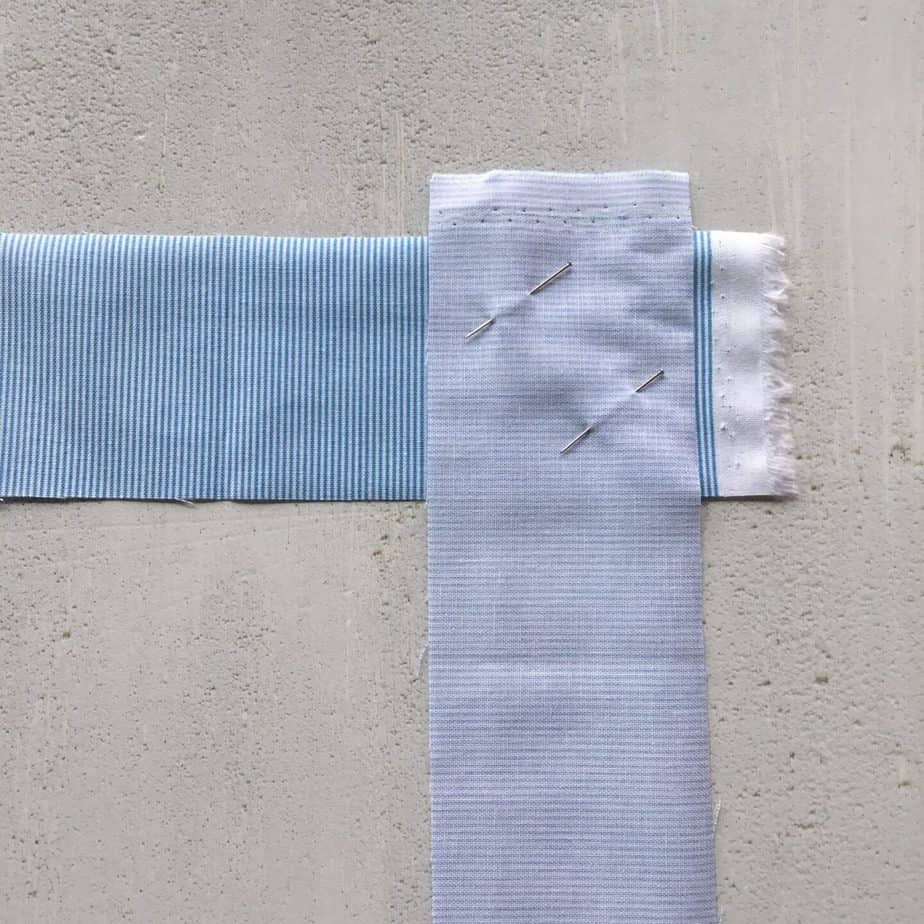
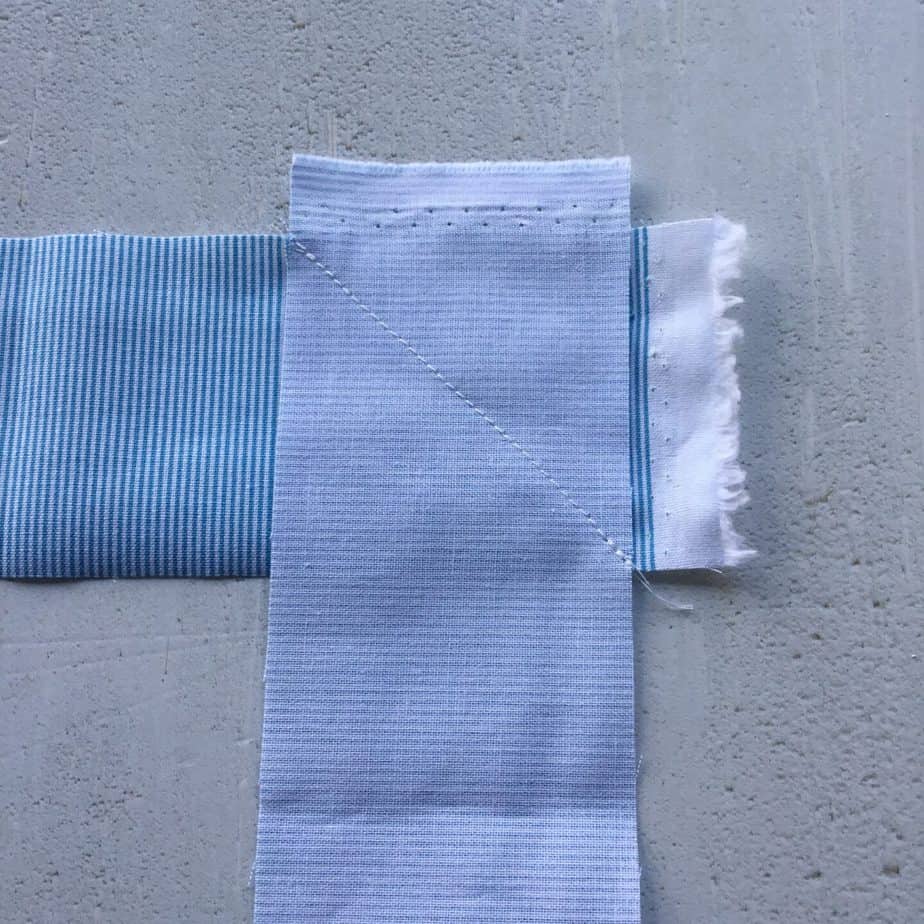

Tip::: I like to pin binding strips diagonally in the direction that I will be stitching
I like to use the selvedge as a guide, over-lapping it on two sides as shown. Sew a diagonal line to join the strips together, using the over-hang of each of the strips as a guide for the corners. The diagonal line can run left-right or right-left.
Repeat these steps for joining the remaining strips together until you have one continuous length of binding.
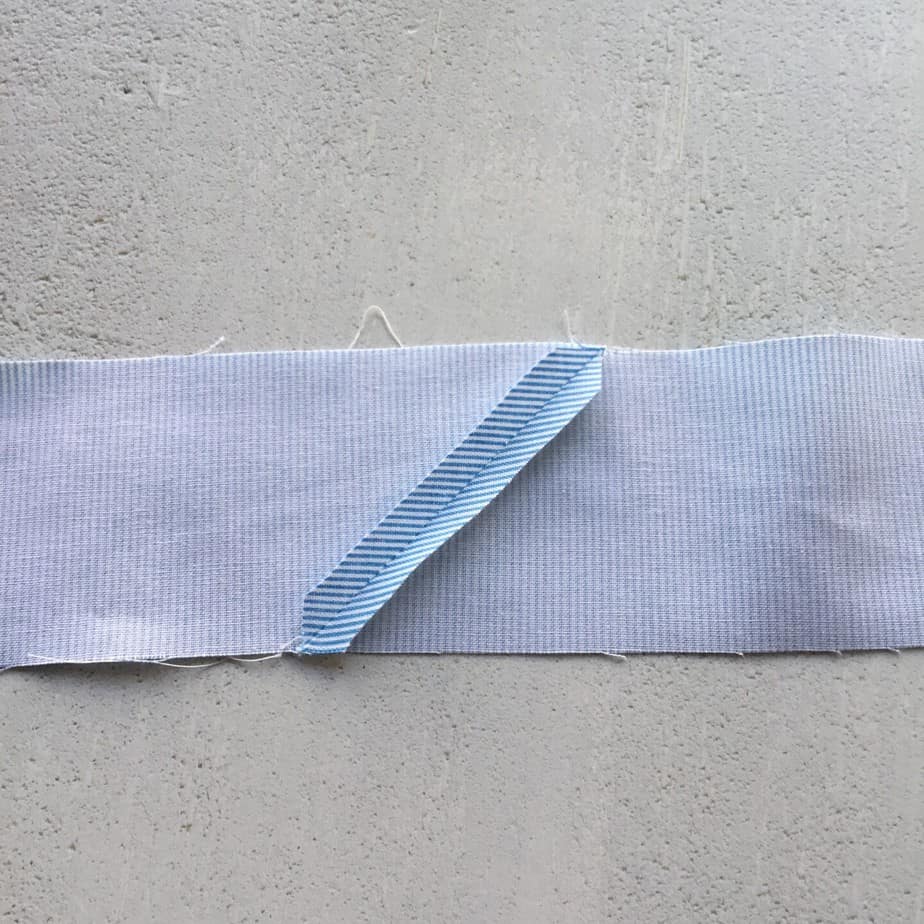
Carefully trim the excess fabric to leave a 1/4″ seam allowance and press the seams open.
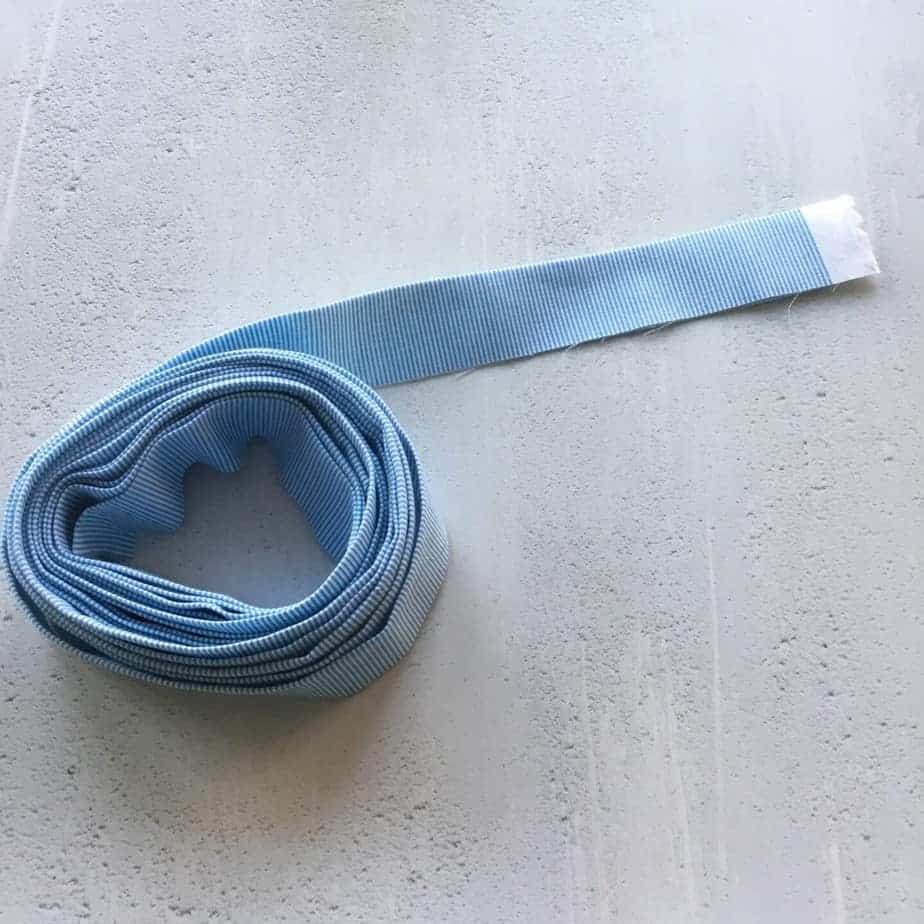
Fold the binding in half – Wrong Sides Together – and press. Roll up and set-aside until you’re ready to bind your quilt.
Attaching the Binding
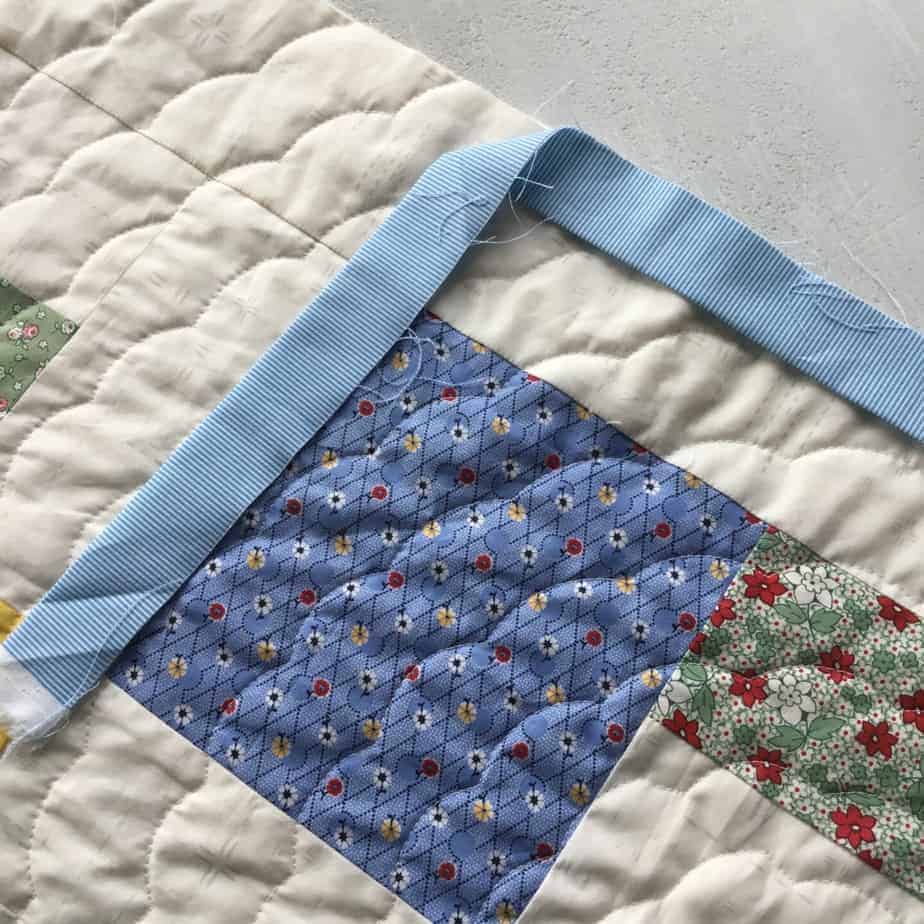
Start half-way along an edge and leave a ‘tail’
Aim to leave 6-8″ of binding free before you start stitching.
Tip::: With my first few quilts, I never quite left a long-enough ‘tail’ when attaching the binding. Although it’s not impossible to bind the quilt when you’ve done this, it certainly makes the job a bit trickier, so it might be worth being a bit more sensible than I was in the beginning!!!
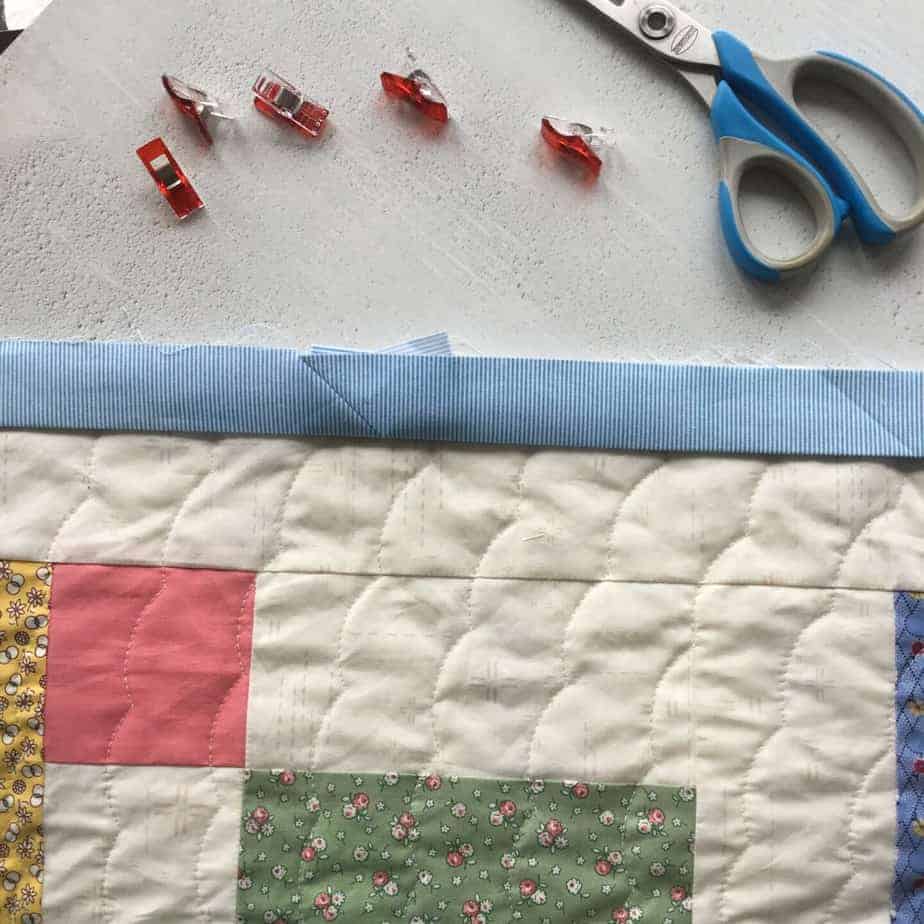
Place the binding on the front of the quilt, halfway along an edge. Match the raw edges of the binding with the edge of the quilt.
Using a walking foot and a 1/4″ seam allowance, begin sewing until you are a couple of inches from the corner. Stop and leave the needle in the down position.
If you don’t have a walking foot to hand, it can help to baste the raw binding edges together to prevent any fabric creep and ensure a neater finish.
GET YOUR FREE Binding Guide NOW!
Get a 4-page guide Including handy hints and tips straight to your inbox!
Binding around the corner
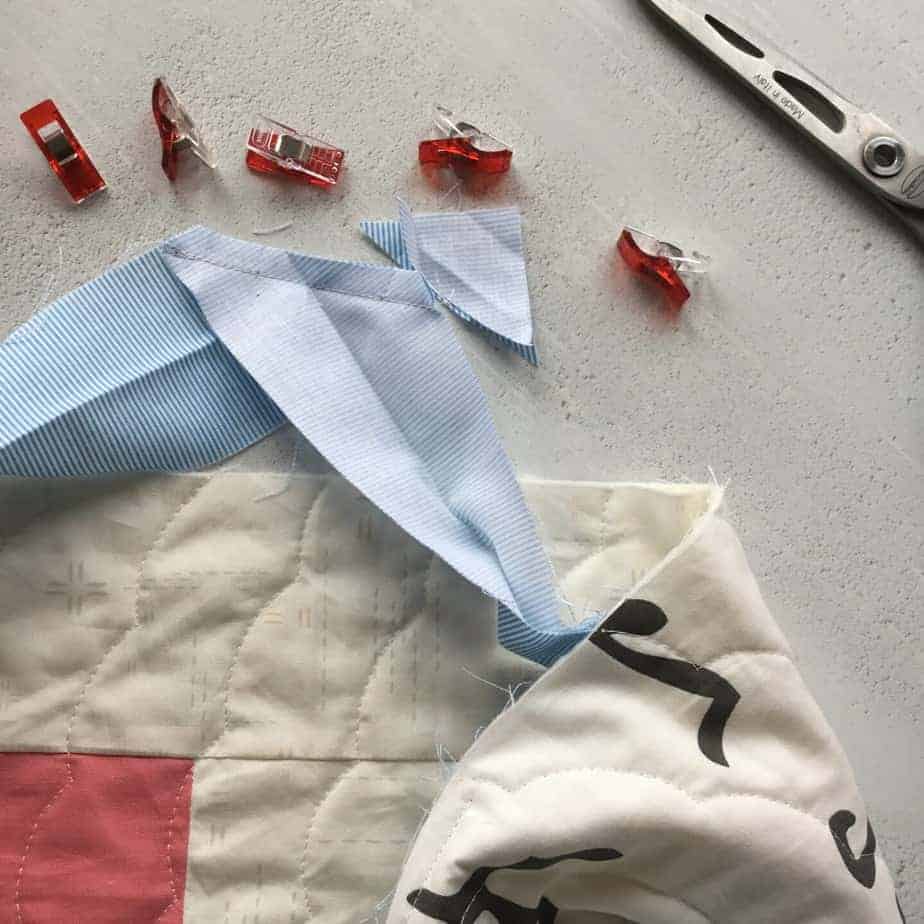
Align the binding along the edge of the quilt, and mark on the binding where the quilt edge ends.
Continue stitching until 1/4″ before the quilt edge and stop, leaving the needle down. Lift the presser foot and rotate the quilt so that you can stitch to the outer corner of the quilt, stitching a 45* line. Secure the stitches and cut the threads.

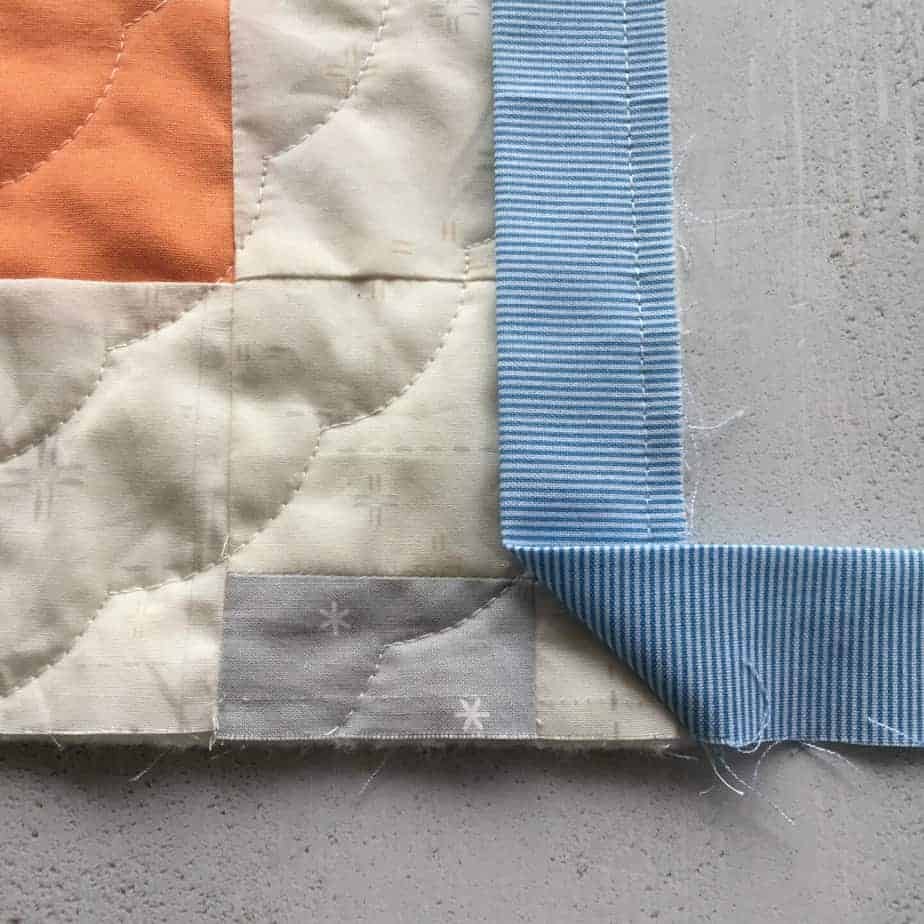
Take the binding and fold it away from the quilt – the 45* angle that you’ve stitched will help to give a neat, mitred edge.
Fold the binding back towards the quilt, matching the raw edges of the binding with the quilt.

Begin stitching from the top edge and continue attaching the binding and going around the corners as detailed. When you reach the final side, stop stitching about 12″ from where you started binding.
How to join the two binding ends together
Starting with the beginning of the binding, align the binding strip with the raw edge of the quilt. I like to use wonder clips to hold the binding in place and make sure that it’s not too tight/loose. Trim the end of the binding off, and set aside (you will be using it in a minute, so don’t put it too far away!).
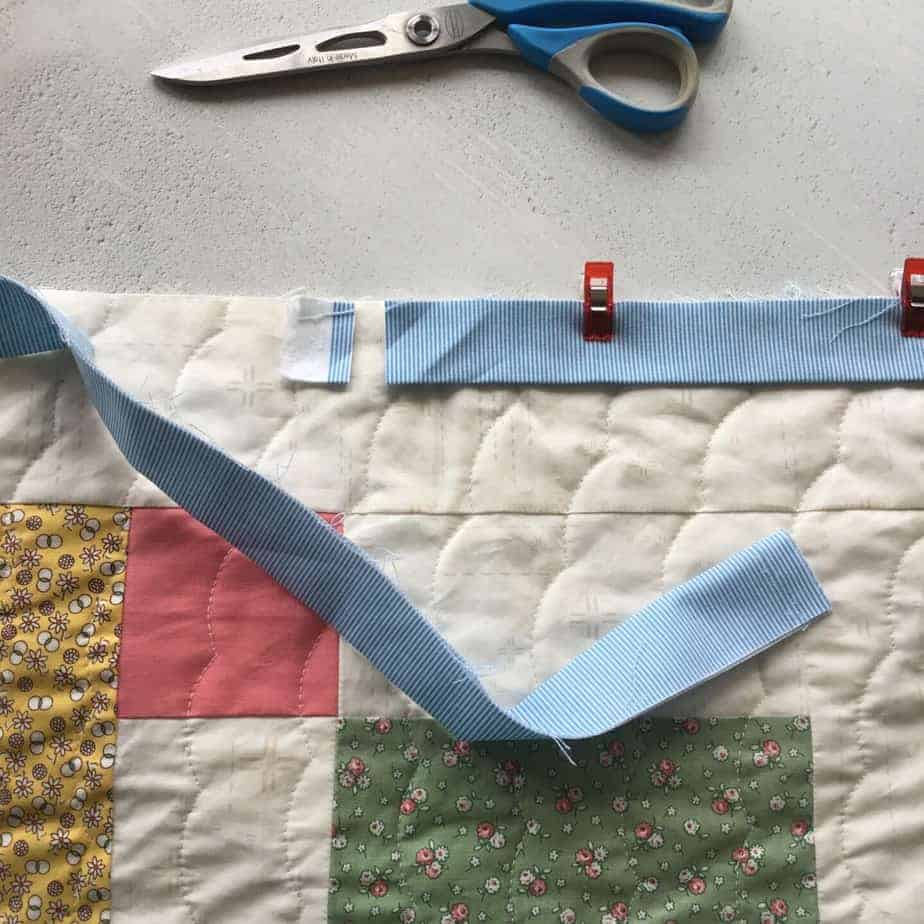

Take the other end of the binding strip, and as before align it against the raw edge of the quilt so that it over-laps with the other strip – I like to place it slightly above the bottom strip so that I can see the end.
Take the binding end that you trimmed off, and lay it on top of the binding (so that it is at a 90* angle). Make sure that the left-hand side matches the end of the bottom binding strip and, trim on the right-hand side (this leaves an overlap between the strips that is the same width as the binding).

Take the two binding ends and place them right sides together at a 90* angle to each other. Draw (or eyeball!) a diagonal line and stitch to join the strips together.
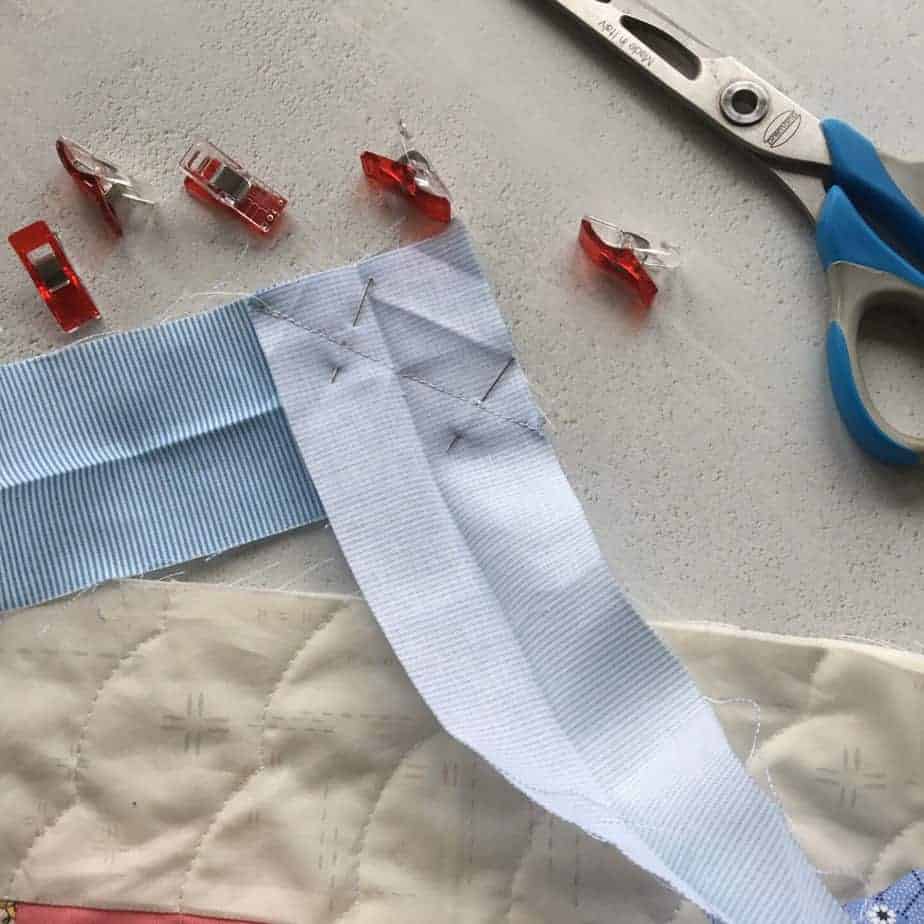

Trim the excess fabric, press the seam open and complete the stitching to finish attaching the binding.
Tip::: I always like to double-check that the binding fits before trimming the excess from the seam allowance, just in case I’ve made a mistake!!!
Press the Binding
Although this step is entirely optional, I have found that it really helps to get a neater finish.
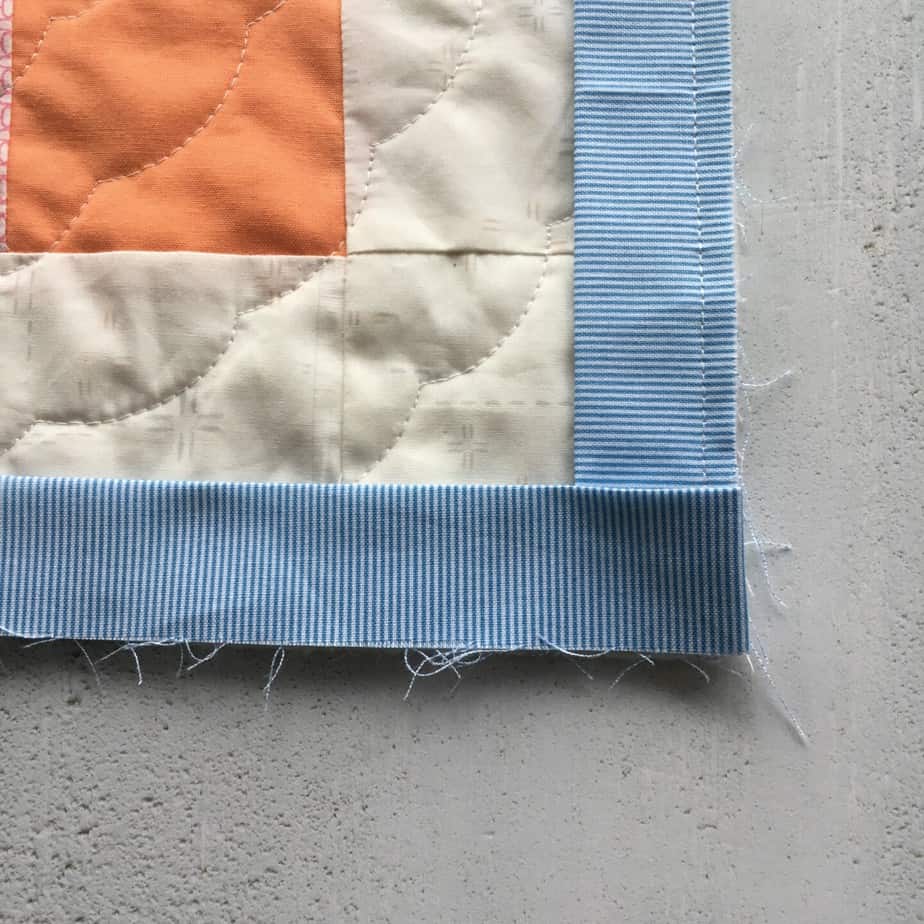
Use an iron to press the binding up, away from the front of the quilt and also press into the corners.
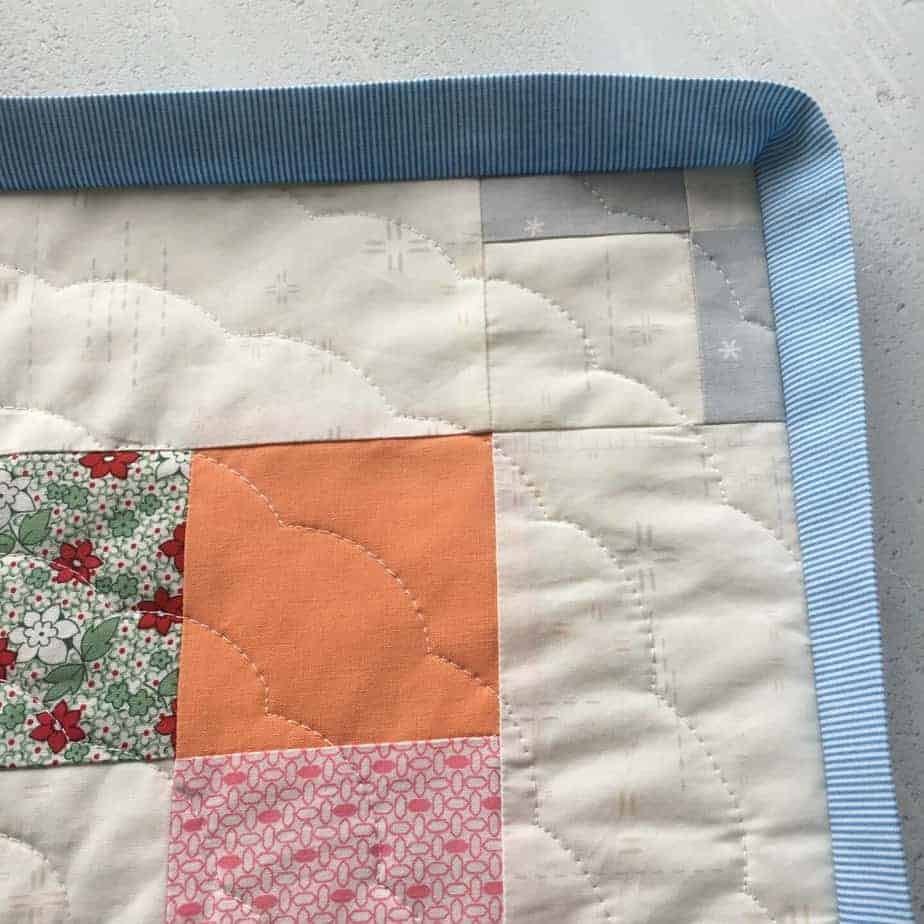
Finishing the Binding
Fold the binding over towards the back of the quilt – I find wonder clips really good for this. I like to work with small sections at a time and move the clips as I go, but you may prefer to secure the binding in one go.
When you get to a corner, fold over the binding on the side where the diagonal seam sits on top first. Wonder Clip in place.


Next, pull out the unfolded side to get a 45* angle, and then fold to the back of the quilt. By doing it this way, the front and back fold meet in the middle, rather than having both folds on one side. This helps to reduce bulk and give a neater finish.
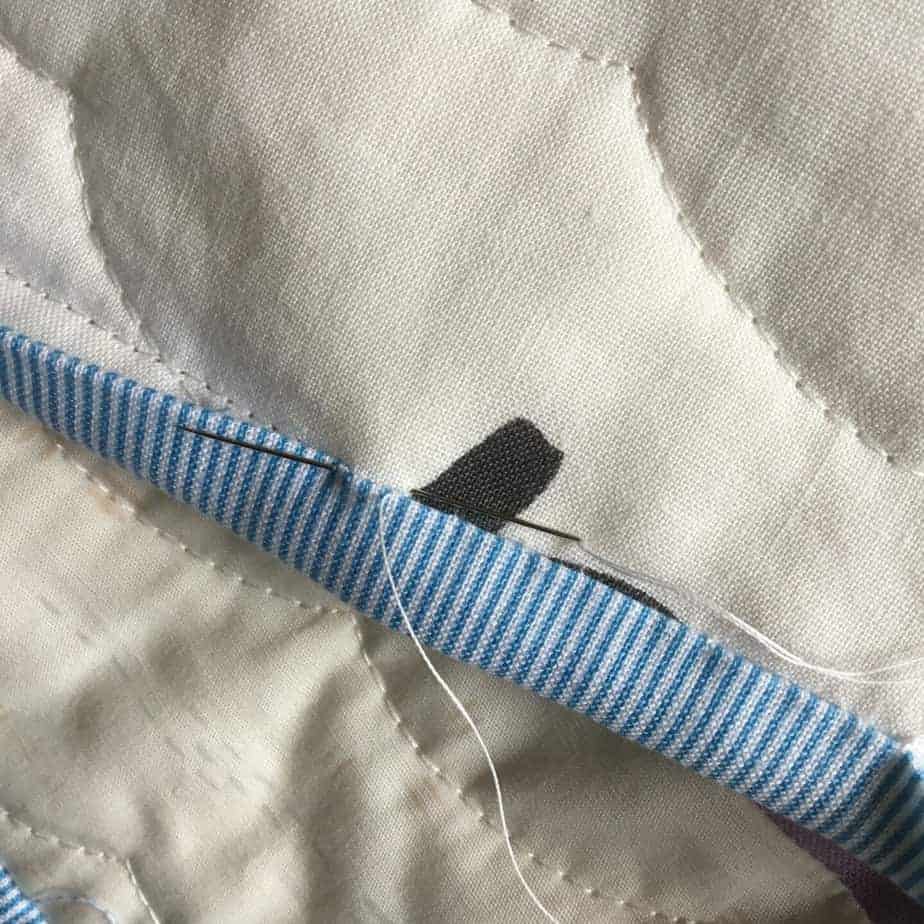
Tips for attaching the binding by hand
- Use a thread the same colour as the binding.
- Slip stitch/ladder stitch as you prefer
- At the corners, stitch the binding that sits at the bottom first before stitching the fold down.

Tips for attaching the binding by machine
- It can be beneficial to cut the binding strips wider so that there is more binding overlap at the back for machine stitching.
- Stitch the binding from the front of the quilt and use a thread colour the same as the quilt top.
- Use a walking foot
- Don’t be afraid to go a bit slower and re-position the binding fabric as you go.

I really hope that you’ve found this tutorial useful and if you have any questions then please do let me know!
S x
Today’s sky::: mostly overcast, but there is some blue sky!
If you would like monthly news and updates, please sign-up to my newsletter.
To check out my quilt and accessories patterns, visit my Pattern shop.
For my favourite sewing equipment and tools, visit my Amazon store.


Thanks for making this! I found it really helpful.
For binding, I always cut strips across the Width of Fabric. It’s more stable and works perfectly (it’s also more economic with fabric!).
And when using a walking foot you want to keep the feed-dogs up, as it helps to grip the fabric better 😀
Looking forward to seeing the finished quilts x
Thanks Sonia, I’m hoping to bind my quilts (2!) this weekend. Are the binding strips cut on the bias and do I need to lower the feed dogs when using the walking foot? Thank you
Hi Gill! The walking foot was a game-changer when I tried it as I found it really helped with all the layers! I hope it helps with your next quilt x
Hi Gretchen! Joining the binding ends was always the tricky bit for me in the beginning so I’m glad you found it useful. Thanks for popping by x
Brilliant tutorial! Thank you. Have to admit when binding, my corners are a bit hit and miss.
Never tried attaching the binding with the Walking Foot. Definitely try it next time and see how I get on.
Best wishes from the UK!
Nice detailed instructions on binding. Good information on joining ends